New in MBS FileMaker Plugin 10.5
 In this article I want to introduce you the new functions from the MBS FileMaker Plugin in version 10.5.
XL - Working with Excel
Let's start with the innovations in the XL topic. With our plugin you can create and edit Excel documents via FileMaker scripts. Also in this release we have new features that extend the functionality of this topic. With the new function XL.CopyColumn you can copy the values of a column of a table into another column. This copying process is not limited to the worksheet or book. You can also copy columns between different books and sheets. These must then be defined in the parameters.
You can use the XL.Sheet.AddDataValidation function to perform data validation for a specific area of a table. For example, you can specify that a column may not be empty or the values are in a range. These data validations can then be removed with XL.Sheet.RemoveDataValidations. This functions works for xlsx files.
The last but not least new function in the component is the XL.Sheet.CellReadValue function. With this function you reads a value from a cell. Depending on the content we return a number, a boolean, a text or a timestamp. Empty, blank or error cells will return an empty value.
CSV Matrix
Another new function is the Matrix.CSVSplit function. With this function we can convert a Comma Separate Value Text into a matrix. For example, if you have the data of a FileMaker database as a CSV file, you can use this function to easily write the data into a matrix and work with it.
List and Quick List
The List and QuickList components get also a new function. With List.FindDuplicateItems and QuickList.FindDuplicateItems we can find duplicate items in the lists. As Return we get a list of the duplicates, but only counts each one once.
Release All
In the MBS FileMaker Plugin there are some topics where we work with objects in memory. Be it a DynaPDF working environment or an image from the GraphicsMagick component. We have to release these objects after they are no longer needed to avoid that they limit the main memory. Up to now it was often only possible to release working environments individually. When we had to free multiple objects it could lead to a lot of writing. In the plugin version 10.5 we have therefore implemented many functions with which you can free all working environments of the appropriate type at once. To give you an overview of the areas for which the ReleaseAll function is available now, here is a list:
- AVExport.ReleaseAll
- AVRecorder.ReleaseAll
- CFunction.ReleaseAll
- CGImageSource.ReleaseAll
- CLibrary.ReleaseAll
- CoreML.ReleaseAll
- DNSLookup.ReleaseAll
- Dictionary.ReleaseAll
- DynaPDF.ReleaseAll
- ECKey.ReleaseAll
- FM.SQL.ReleaseAll
- FSEvents.ReleaseAll
- JS.ReleaseAll
- JavaScript.ReleaseAll
- LDAP.ReleaseAll
- MarkDown.ReleaseAll
- Matrix.ReleaseAll
- MenuItem.ReleaseAll
- PDFKit.ReleaseAll
- PKCS12.ReleaseAll
- PKCS7.ReleaseAll
- PKey.ReleaseAll
- SSH.ReleaseAll
- SendMail.ReleaseAll
- Shell.ReleaseAll
- SmartCard.ReleaseAll
- TouchBar.ReleaseAll
- UserNotification.ReleaseAll
- WMFP.ReleaseAll
- WMIQuery.ReleaseAll
- WinSendMail.ReleaseAll
- WindowsML.ReleaseAll
- WindowsUserNotification.ReleaseAll
- WordFile.ReleaseAll
- X509.ReleaseAll
Function Platforms
If you want to know which platform a MBS function is running on, you can use the new function "Plugin.GetFunctionPlatforms" to check the platform compatibility. As an answer you will get a string with letters. The letter W stands for Windows, M for Mac, L for Linux and I for the iOS SDK. So if you would execute the following line in your script, $r would contain the result: WMLI Set Variable [ $r ; Value: MBS( "Plugin.GetFunctionPlatforms"; "Archive.Extract") ] Because the function Archive.Extract is avidable for all platforms
DynaPDF
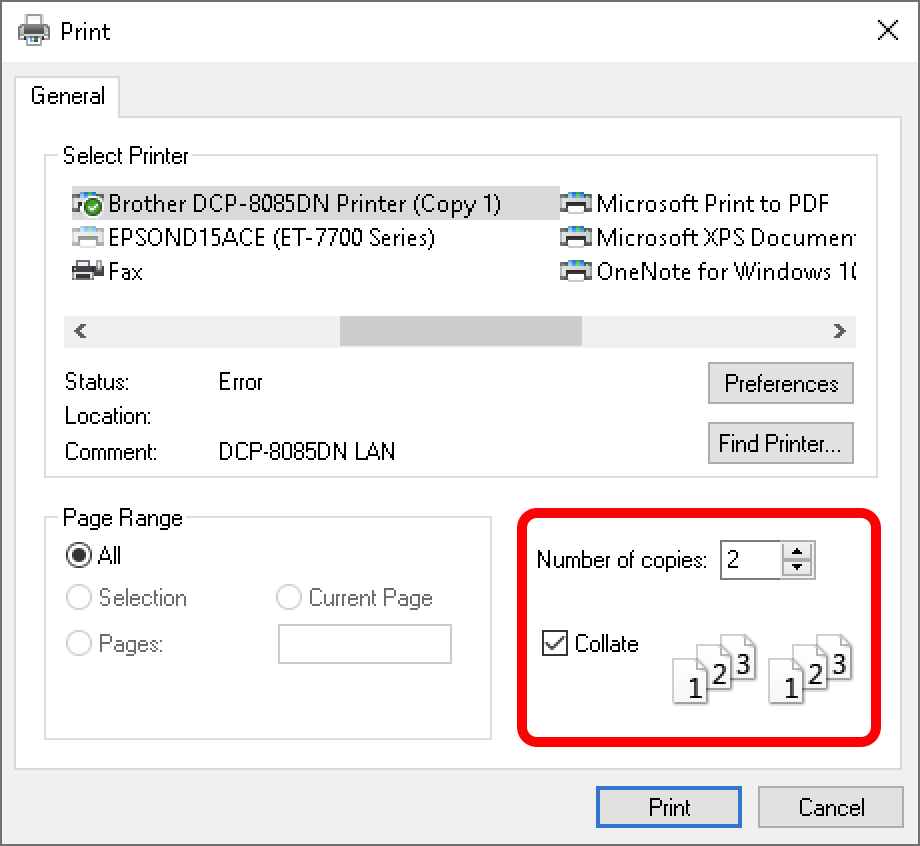
We have some new features in the topic DynaPDF. On Windows you can now use collate and sorting options for printing with DynaPDF.Print function:
There are two new functions for barcode handling under DynaPDF. With the function DynaPDF.InsertBarcode we can create a barcode on the active page. In the parameters we then specify the properties of the barcode as JSON. For example, we can define the content, the position and the size. Here we see how such a JSON can look like.
Set Variable [ $rt ; Value: MBS( "DynaPDF.InsertBarcode"; $PDF; „
{ \"BarcodeType\": \"QRCode\",
\"Data\": \"Hello World\",
\"PosX\": 100,
\"PosY\": 100,
\"Width\": 50,
 \"Height\": 50 }
" ) ]

The advantage of using this function is that the barcode is generated directly in the PDF and is therefore not pixelated, as it would be the case with a barcode as an image. How the default settings are, when inserting a barcode, is received by the DynaPDF.GetDefaultBarcodeParameters function. It returns a JSON with the default settings as JSON. We can then use the JSON functions to change parameters in the returned JSON and pass them to the DynaPDF.InsertBarcode function.
The new function DynaPDF.GetDescent returns the descender of the active font. The descender is a typographic value that specifies the maximum extent to which characters in the active font descend below the baseline. The descender is normally a negative value. In this function it is always returned as a positive value to make the usage easier.
We also have a new function that creates a symmetrical polygon. To do this, you specify the position of the center, the radius, the rotation angle, the number of sides and the fill mode in the parameters of the DynaPDF.DrawNGon function. The minimum number of sides is three.

The DynaPDF.WriteFText or DynaPDF.WriteFTextEx functions can now write links directly with \LK[] tag. You can define highlight mode and format links as needed like with underline and blue font.
In this release, a lot of attention is focused on the return as JSON text. We have added some functions that return information about a PDF working environment and its content as a JSON array or object. You can get annotations, bookmarks, colorspace, embedded files and much more as JSON. Here is a list of the new functions that have JSON returns in the DynaPDF:
- DynaPDF.GetAnnotationAsJSON
- DynaPDF.GetAnnotationsAsJSON
- DynaPDF.GetBookmarksAsJSON
- DynaPDF.GetColorSpaceAsJSON
- DynaPDF.GetColorSpacesAsJSON
- DynaPDF.GetDocInfoAsJSON
- DynaPDF.GetEmbeddedFileAsJSON
- DynaPDF.GetEmbeddedFilesAsJSON
- DynaPDF.GetFieldAsJSON
- DynaPDF.GetFieldsAsJSON
- DynaPDF.GetFontAsJSON
- DynaPDF.GetFontsAsJSON
- DynaPDF.GetImportDocInfoAsJSON
- DynaPDF.SysFontInfoAsJSON
JSON
As you have already seen at DynaPDF, we focus on the output as JSON text. We also have a few other new features that work with JSON output.
With the function Files.ListAsJSON you can get the name of the files in folder as JSON Array. In the Parameters you can define which Keys the JSON Objects should include. Optional you can set a filter, it limits what is returned. For example we only want to get entries that are files.
The FM.SQL.JSONColumn function returns us a JSON array with the entries of one column. in the parameters we give a reference to a SQL query in the database. That means we act on the result of this SQL query. We get such a reference number e.g. from the function FM.SQL.Execute.
Also on the topic CUPS, there are two new functions that returned us a JSON. On the one hand we can list the printers with CUPS.GetPrintersAsJSON and with CUPS.GetJobsAsJSON we can list the printer jobs as JSON.
CURL
With the new function CURL.GetProxyError we can return the error code of a proxy. This makes a more accurate error detection and handling possible. For example, you can use Case to distinguish between several error codes and react to them appropriately by, for example, giving the user a dialog explaining where the error might be.
Mac
There are also new features for Mac and the iOS SDK.
Syntax
We would like to introduce a new function that helps you to write your formulas. If you use the SyntaxColoring.ShowBracketPositions.SetEnabled function, you can make related brackets visible in your text by clicking on the bracket. The corresponding parenthesis is highlighted in blue. This helps you e.g. in SQL queries or JSON texts. The function works for curly brackets, square brackets and regular brackets. This usually ignores quoted text, except if your selection is within quoted text. Then we look for brackets in this text to help with e.g. SQL commands.
System Info
There are three new functions that give you information about your system. The output of each function is a JSON that contains several elements with system information. With the SystemInfo.CPULoad function you can query values of the CPU. With theSystemInfo.AppUsageStatistics function you get information about information about resource utilization and with the SystemInfo.MachoArchInfo function you get information about the Macho Architecture
{
   "byteorder" : 1,
   "cpusubtype" : 8,
   "description" : "Intel x86-64h Haswell",
   "name" : "x86_64h",
   "cputype" : 7
}
Selections in the TextView
The big headline in the Textview topic additions are the selections. We can now select specific areas in a TextView via script by selecting our start with TextView.SetSelectionStart and then determining the length of this selection with TextView.SetSelectionLength. We can also specify the selection directly with the function TextView.SetSelection. In this function we then specify the start and length in the parameters. We can make different insertions. So we can replace marked parts of the text with new ones by script. The selection of the function depends on what kind of text is actually to be inserted. The following functions are available for this.
TextView.GetSelectedHTMLText TextView.GetSelectedPlainText TextView.GetSelectedRTF TextView.GetSelectedStyledTextThere are also new functions that return the marked text. Again, the selection depends on whether we want the e.g. HTML text for this text or the plain text.
Font Manager
You want to use Apple Typical Icons in your solutions e.g. you want to show that your solution is capable of AirPlay and because that you want to show the Airplay icon. You can now use our new function FontManager.ImageWithSystemSymbolName to do this. With the indication of the name of the desired symbol and the size the image is created. You can find the list of the symbols under https://developer.apple.com/design/human-interface-guidelines/sf-symbols/overview/. This function needs macOS 11.0 or iOS 14.
CN Contact
For Apple Contacts there are also two new functions, so you can use CNContactStore.ContactsMatchingPhoneNumber to display the matching contact for a phone number and CNContactStore.ContactsMatchingEmailAddress to display the matching contact for an email address. This way you can find out for example if a phone number or email address is already stored in your contacts. If the phone number or email address is not yet stored in the contacts, we get an empty list and can create a new entry for example.
Subtiles
For the AV player, we have a new feature called AVPlayer.SetShowsSubtitles that allows us to enable and disable subtitles. For example, you can let the user choose at the touch of a button whether to display subtitles for a clip. You can also query this setting with the AVPlayer.GetShowsSubtitles function.
Windows
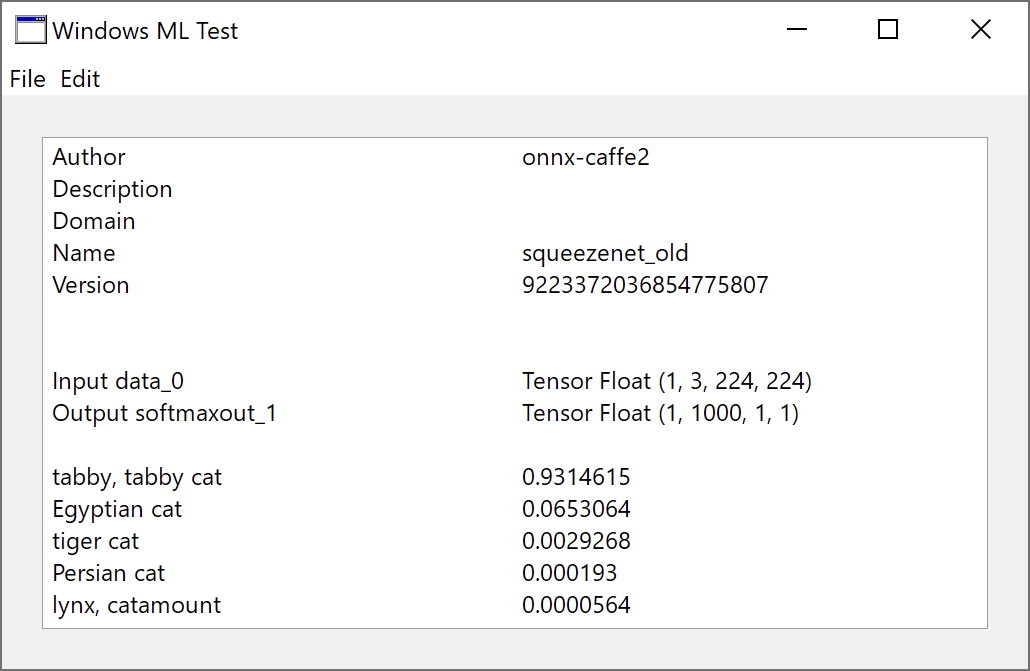
There is also new gerate functionality for Windows: WindowsML Core ML is machine learning for Windows. Since a while we made machine learning already possible for the Mac with the plugin. You can now e.g. identify the main object on an image under Windows. What exactly you want to do depends on your model Use WindowsML.Open to load the model and query all information about it with WindowsML.Description function. Use bind functions like WindowsML.BindImageFile to assign input image, run the model with WindowsML.Evaluate function and then you get a result as JSON. You may use our JSON functions to work on the result and show it to the user.
We hope you will also find some interesting new features. We wish you a lot of fun with MBS FileMaker Plugin Version 10.5. If you need a license or have any questions, please contact us.
by Stefanie Juchmes